Integrate ChatGPT into your WordPress website by obtaining an OpenAI API key, installing a compatible plugin, and configuring settings for an interactive and dynamic user experience.
- Brand Storytelling and Messaging:
- Crafting a compelling narrative for your website is crucial to engage visitors. ChatGPT can help refine your brand story, suggesting impactful messaging that resonates with your target audience. Whether it’s about page content, mission statements, or product descriptions, ChatGPT can infuse creativity and clarity into your brand’s voice.
- User Experience (UX) Ideation:
- Building an intuitive and user-friendly website requires thoughtful UX design. ChatGPT can contribute to the ideation process by proposing layout structures, navigation flowcharts, and interaction design concepts. Describe your target audience and goals, and let ChatGPT offer suggestions to enhance the overall user experience.
- Content Marketing Strategies:
- Beyond just generating content, ChatGPT can assist in strategizing your web hosting content marketing efforts. Whether you’re planning a blog schedule, creating an editorial calendar, or brainstorming topics for social media posts within the web hosting domain, ChatGPT can provide ideas aligned with your brand’s messaging and industry trends. This ensures your web hosting content resonates effectively with your audience.
Incorporating ChatGPT into the creative aspects of website development adds a layer of innovation and efficiency, freeing up your creative bandwidth to focus on refining and implementing these ideas.

Purchase a Hosting Solution and Acquire a Domain Address
Before initiating your one-click WordPress website construction with ChatGPT, secure a suitable domain name and hosting package, favoring providers optimized for WordPress server configurations.
Begin your one-click WordPress website development with ChatGPT by first selecting an appropriate domain name and hosting plan, leaning towards providers specializing in one-click WordPress setups.
Kickstart your one-click WordPress website powered by ChatGPT by choosing a fitting domain name and hosting solution, with a preference for providers offering one-click WordPress server configurations.

Commence your one-click WordPress website creation with ChatGPT by carefully choosing a domain name and hosting package, emphasizing providers with one-click setups fine-tuned for optimal WordPress performance.
Prioritize the selection of an apt domain name and hosting plan before embarking on your one-click WordPress website construction with ChatGPT, favoring providers specializing in one-click WordPress server configurations for an efficient setup.
Create Your WordPress Site Pages with ChatGPT
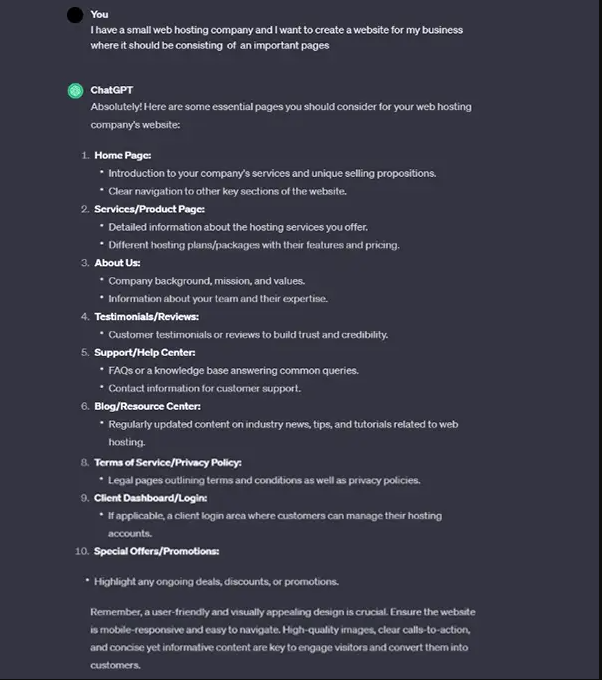
create a homepage for my website where it should follow like this hero section reviews plans and product unique points customer reviews the faqs
<!DOCTYPE html>
<html lang="en">
<head>
 <meta charset="UTF-8"><title>Your Web Hosting Company</title>
 <link rel="stylesheet" href="styles.css">
</head>
<body>

 <!-- Hero Section -->
 <section class="hero">
 <h1>Welcome to Your Hosting Company</h1>
   <p>Best-in-class web hosting solutions for your online presence.</p>
  <a href="#plans" class="cta-button">View Plans</a>
</section>

 <!-- Reviews Section -->
 <section class="reviews">
<!-- Customer Reviews/Testimonials -->
   <div class="review">
  <blockquote>"Fantastic service! Reliable hosting and excellent support."</blockquote>
     <p>- John Doe</p>
   </div>
  <div class="review">
     <blockquote>"I've been with them for years and never faced any downtime."</blockquote>
    <p>- Jane Smith</p>
    </div>
    <!-- Add more reviews as needed -->
  </section>

<!-- Plans and Products Section -->
 <section id="plans" class="plans">
 <h2>Hosting Plans</h2>
 <!-- Plan 1 -->
 <div class="plan">
     <h3>Basic Plan</h3>
  <p>Starting at $5/month</p>
  <ul>
    <li>10GB Storage</li>
       <li>Unlimited Bandwidth</li>
      <li>24/7 Support</li>
  </ul>
   <a href="#" class="cta-button">Learn More</a>
   </div>
  <!-- Plan 2 -->
   <div class="plan">
    <!-- Add details for other plans similarly -->
   </div>
 </section>

 <!-- Unique Points Section --> <section class="unique-points">
   <h2>What Makes Us Unique</h2>
    <ul>
    <li>99.9% Uptime Guarantee</li>
    <li>Free SSL Certificates</li>
     <li>Easy-to-use Control Panel</li>
     <!-- Add more unique selling points -->
   </ul> </section>

 <!-- Customer Reviews Section -->
 <section class="more-reviews">
 <!-- Additional customer reviews -->
</section>

 <!-- FAQs Section -->
 <section class="faqs">
 <h2>Frequently Asked Questions</h2>
   <!-- FAQ content -->
</section>

</body>
</html>
Create a web page containing a contact form. by following fields: name, email address, and phone number.
<!DOCTYPE html>
<html lang="en">
<head>
  <meta charset="UTF-8">
  <title>Contact Form</title>
  <style>
    /* Basic styling for the form */
    body {
      font-family: Arial, sans-serif;
      margin: 0;
      padding: 20px;
    }
    .container {
      max-width: 400px;
      margin: 0 auto;
    }
    .form-group {
      margin-bottom: 20px;
    }
    label {
      display: block;
      margin-bottom: 5px;
    }
    input[type="text"],
    input[type="email"],
    input[type="tel"] {
      width: 100%;
      padding: 8px;
      border-radius: 4px;
      border: 1px solid #ccc;
    }
    input[type="submit"] {
      padding: 10px 20px;
      border: none;
      border-radius: 4px;
      background-color: #007bff;
      color: #fff;
      cursor: pointer;
    }
    input[type="submit"]:hover {
      background-color: #0056b3;
    }
  </style>
</head>
<body>

  <div class="container">
    <h2>Contact Us</h2>
    <form action="#" method="post">
      <div class="form-group">
        <label for="name">Name:</label>
        <input type="text" id="name" name="name" required>
      </div>
      <div class="form-group">
        <label for="email">Email Address:</label>
        <input type="email" id="email" name="email" required>
      </div>
      <div class="form-group">
        <label for="phone">Phone Number:</label>
        <input type="tel" id="phone" name="phone" required>
      </div>
      <input type="submit" value="Submit">
    </form>
  </div>

</body>
</html>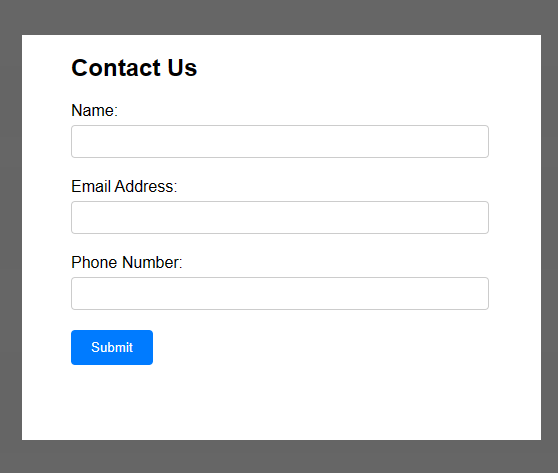
Restrictions of Using ChatGPT to create a Website
Complexity and Specificity: ChatGPT, while adept at generating human-like text and providing information, might struggle with the intricacies and specific requirements of web development. It lacks the detailed understanding of code syntax, design principles, and intricate functionalities needed for creating a fully functional website. It might not be able to handle complex programming or intricate design elements with precision.
Functionality: ChatGPT operates on static inputs and outputs. It might struggle to create highly interactive or dynamically functional aspects of a website such as complex forms, real-time updates, or database integrations. The ability to dynamically respond to user inputs or create complex user interactions goes beyond the capabilities of a text-based AI model like ChatGPT.
Experience: While ChatGPT can provide general guidance or basic structures, it may lack the nuanced understanding of user experience (UX) design principles and tailored customization required for a website to effectively engage visitors. Creating a unique, user-friendly interface, optimizing for different devices, and ensuring a seamless user journey often demand human creativity and understanding beyond the capabilities of an AI model.